Ever faced the dread of your phone battery dying when you need it most, only to discover your phone isn’t charging at all or is charging painfully slow? You’re not alone.
This guide will help you figure out if your charging port is damaged, show you how to spot the signs for all major devices (including Samsung, iPhone, Android, and laptops), and give you simple solutions to get your phone charging again without spending a penny.
Let me share the real-life problem of dealing with a stubborn charging port, the frustration it can bring, and the step-by-step fix that anyone can follow at home. I’ll also cover how to clean your charging port safely, keep your phone (and its screen) looking fresh, and know whether you have water damage or more serious issues.
Why Phones Sometimes Stop Charging: Everyday Problems and Frustrations
When my phone runs low on battery, I start to feel nervous. It’s on me all day, keeping me connected, organized, and entertained. The second that warning pops up, I scramble for a charger. But nothing’s worse than realizing your phone isn’t charging, or charges so slowly it might as well be off.
What does this look like in real life? Here’s a scene I know well:
- You plug in the charger, but nothing happens.
- The phone says it’s charging, then randomly stops.
- You wiggle the cord, sometimes it helps, sometimes not.
- You leave your phone alone, start doing something else, come back, and the battery is just as low as before.
- When you need your phone the most, it gives up on you.
When this happens, the first reaction is usually panic or frustration. I’ve found myself running to a phone repair store in the pouring rain just to get some power back. But most of the time, the problem isn’t as big as it first seems.
Many people think the battery is to blame whenever charging fails. That’s often not true. More often than not, after years of plugging and unplugging, walking around with the phone in pockets or bags, and letting dust build up, the real cause is a dirty or blocked charging port.
Typical Signs of a Damaged or Dirty Charging Port
- Charger only works if you hold it at a certain angle
- Phone charges slowly or not at all
- Charging icon flashes on and off
- Charger fits loosely, or won’t “click” in
- Intermittent charging or disconnection alerts
These are all great clues when you want to know if your charging port is damaged on a Samsung, iPhone, Android, or even a laptop. Keep reading for step-by-step solutions.
Step-by-Step Guide: Fixing Charging Port Problems at Home
Here’s what I do when my phone’s charging acts up, long before paying for repairs.
Restart Your Phone
The first thing I try is simple: turn the phone off and restart it. This sounds basic, but it knocks out a surprising number of annoying problems, including temporary charging bugs.
Sometimes phones get stuck on a glitch, which makes the battery or charger act up. A quick restart helps clear these temporary glitches. If it works, you’re set. If not, keep going.
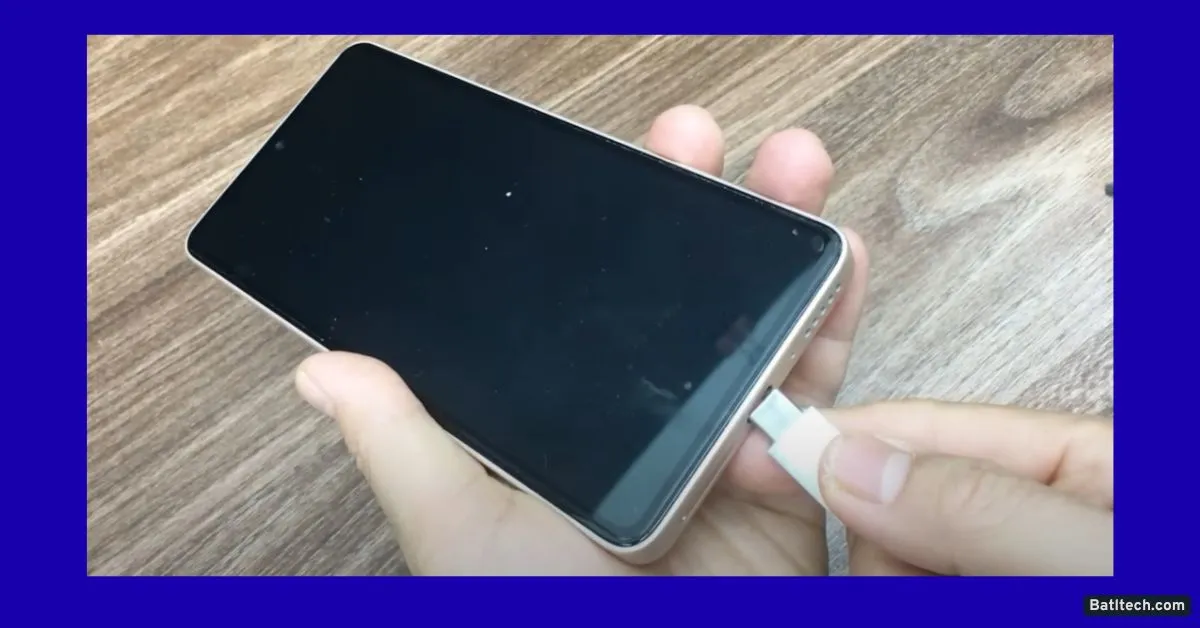
Check the Charger and Cable
Before blaming the phone, I make sure the charger and cable aren’t the real issue. Cables can tear inside, or chargers can fail for no good reason.
Here’s how I check:
- Plug your charger into another device with the same type of port (like a flashlight or a friend’s phone).
- If the other device charges, the charger and cable are good.
- If it doesn’t, try a different charger or cable on your phone.
This way, you won’t waste time or money fixing your phone when the charger is the problem. Always rule out the easiest fix first.
Easy Checklist for Charger Testing
- Use a different device with the same style port
- Check for charging light or indicator
- Swap cables if needed
If the charger works, the issue is probably in the charging port.
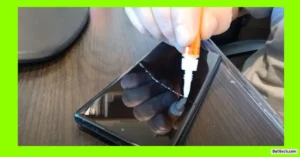
Clean the Charging Port: The Most Overlooked Fix
Nine times out of ten, a dirty charging port causes charging failures. Dust, lint, and pocket fuzz sneak in, especially if you carry your phone in a pocket or bag. Over time, they build up and block the connector so the charger can’t make contact. This applies to all phones, so if you want to know if your charging port is damaged on Android, iPhone, Samsung, or even a laptop, always check for dirt first.
What You Need to Clean a Charging Port
- Old toothbrush
- Isopropyl alcohol (quick-drying is best)
- Tissue paper made from wood pulp, a cotton face towel, or non-woven fabric
(not regular cheap tissue that falls apart) - Toothpick
- Scissors
- Hair dryer (optional, for drying)
Step-by-Step Cleaning Process
- Turn Off the Phone: Always start with the phone powered down for safety.
- Brush Out the Dust: Take a dry, soft toothbrush. Gently brush inside the charging port to knock loose any obvious dust, lint, or hair.
- Prepare Safe Cleaning Tissue: Cut out a small piece of strong tissue or fabric. Wrap it around a toothpick so it fits in the port but doesn’t leave fibers behind.
- Dampen with Alcohol: Pour a little isopropyl alcohol into a cap. Dip the tissue-tipped toothpick lightly. Don’t soak it—just enough to pick up dust.
- Gently Clean the Port: Insert the toothpick, gently moving back and forth. Be extra gentle, feeling for resistance. Never force anything inside the port, which could damage the tiny pins.
- Let It Dry: Alcohol evaporates quickly, but for extra safety, use a hair dryer on a low, cool setting. Hold it a few inches away and blow directly into the port for a short time.
- Test Charging: Plug the charger back in. Most times after cleaning, the phone will charge normally.
Important: Don’t use too much force or any sharp metal objects inside the port. Never pour liquid straight into the port.
Why Cleaning Your Charging Port Works
Inside the port are tiny pins that connect to your charger. Even a thin layer of dust or lint can block the connection, causing slow, unreliable, or total charging failure. Cleaning lets your charger sit snugly, making a good connection just like new.
How to Know if Charging Port Is Damaged—All Devices
After you clean, if you still see these signs, your port may have deeper damage:
- Charger wiggles loosely or won’t stay in
- No charging sign appears at all
- Device only charges with heavy pressure
- Port looks bent or pins seem broken inside
Here’s how to know if a charging port is damaged on specific devices:
Samsung: If “moisture detected” errors pop up or the phone won’t charge even after cleaning, the port may be corroded. The charger should fit tightly, and phone settings often display charging errors if the port fails.
iPhone: Look for a “This accessory may not be supported” message, repeated disconnecting sounds, or visible bent pins. If you want to know how to know if the charging port is water damaged on an iPhone, look for rust, greenish residue, or repeated ‘liquid detected’ warnings.
Android (all brands): Android phones might vibrate or flash the battery icon but not charge. A loose port or the phone only charging at a certain angle means damage.
Laptop: Laptops show charging signs on the battery indicator. If the charger is secure but the laptop won’t recognize power, or the port feels loose, it could be a damaged port.
How to Fix Damaged Charging Ports?
If the port still won’t work even after cleaning, you might be dealing with a bent or broken pin inside. Sometimes, you can carefully realign a pin with a toothpick, but avoid poking or pushing hard. For real structural damage (loose port, heavy wear, water damage), professional repair is the best option. I never recommend taking apart the device on your own unless you’re experienced.
How to Fix Charging Port on Android?
Most Android phones are highly fixable if dust, lint, or sticky residue is the cause. Remove the SIM card if you’re worried about moisture. Follow the cleaning steps above, then gently blow out the debris—never use sharp tools!
Why Cleaning and Maintenance Should Be a Habit?
Regular care saves both stress and money. If you clean your charging port every month, you keep dust and lint out. This simple habit can keep your device working for years. For those who keep phones in pants pockets (especially men’s jeans), lint and small fabric bits are the main enemies. Even if your pants are clean, those tiny bits still sneak into the port every day.
Benefits of Regular Cleaning:
- Prevents slow, unreliable charging
- Charger fits snugly
- Reduces risk of permanent damage
- Makes devices last longer
- Avoids expensive repairs
Don’t wait until your device stops charging before you clean. Take a minute to maintain your gear and avoid bigger headaches later.
How to Clean Your Phone Screen Like a Pro?
Clean screens look good and work better. Smudges and fingerprints collect over time, and regular quick cleans help keep your screen responsive and sharp.
Method 1: Use a Microfiber or Soft Cloth
Microfiber cloths are perfect for cleaning phone screens. They’re gentle, hang on to tiny dust particles, and won’t scratch your display.
How I Do It:
- Dampen the cloth slightly (not soaking wet).
- Wipe gently from top to bottom, using a circular motion for stubborn spots.
- Avoid paper towels, rough cotton, or anything with nylon. These can scratch your screen and leave small fibers behind.
Never use household cleaners or sprays directly on the phone. Just water and a soft touch does the trick.
Method 2: Diluted Vinegar Solution for Tough Stains
Sometimes, sticky stains or grease marks need more than a wipe. Vinegar works, but you have to dilute it to keep it safe for your screen.
What You Need:
- White vinegar
- Clean water
- Soft, lint-free cloth or towel
How to Make the Solution:
- Mix vinegar and water 50:50 in a small bowl or cup.
How to Clean:
- Dampen your cloth in the solution. It should be barely wet, not dripping.
- Gently wipe the screen, focusing on fingerprints or stubborn spots.
- Use a dry, clean cloth right after to remove any streaks.
Warning: Never use pure vinegar on your phone. It can eat away at the screen’s special coating. Keep the cloth just barely damp, and never pour liquid directly onto your device.
How to Know if Charging Port Is Water Damaged (Especially iPhone)
Water and electronics don’t mix. If your iPhone or any phone gets wet, the charging port becomes very vulnerable:
- Look for green, blue, or white residue in or around the port.
- Your phone shows “liquid detected in Lightning connector” (for iPhones), or refuses to charge completely.
- Repeated warning popups about moisture, even when the phone is dry.
Dry your phone fully before charging again. Use a hair dryer on a gentle, cool setting, and leave your phone off for several hours before testing.
Conclusion
Have you tried these tips and tricks on your device, or do you have your own methods for fixing and cleaning charging ports? Maybe you’ve figured out how to know if your charging port is damaged on a Samsung or how to fix a charging port on Android.
Read also.
- My phone says there is water in charging port but its dry? Fix Charging Port Issues in 2025
- How to Fix iPhone Camera Flipping Problem Solution 2025: Complete Guide for All iPhones
- How to Fix a Phone Stuck on Boot Screen Redmi Note 2025 (Step-by-Step)

Hello! I am Manjunath Kumar. Welcome to batltech.com! BatlTech delivers the freshest mobile updates together with cutting-edge news and technology insights to all users. Our mission involves providing the latest updates regarding smartphones